


Here you can find the instructions on how to flash your MT6516 based phone. Although example images shown here refer to a specific phone, you can flash other phones based on this MediaTek chipset, with the correct ROM files, of course.
Make sure you read everything carefully and know what you are doing. Don't blame me for any damage on your phone.
What's needed:
Make sure you read everything carefully and know what you are doing. Don't blame me for any damage on your phone.
What's needed:
- Flashing cable (USB to UART cable with PL2303 chip)
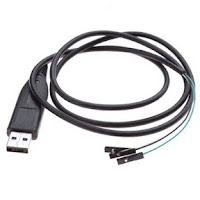
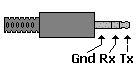
USB to UART cable Pinout (phone side)
- USB data cable
- Profilic PL2303 drivers
- MediaTek USB VCOM drivers
- SP Flash Tool (v1.1110 or higher)
- SN Write Tool (alternatively Maui META or WriteCode can be used as well)
And now the tutorial...
- Make sure that you have already installed the Profilic PL2303 drivers needed for the USB to 3,5 mm headphone cable.
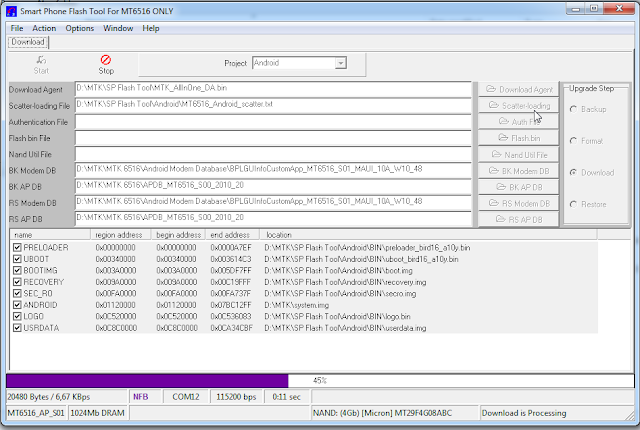
- Open SP Flash Tool for MT6516 and chose which system you want to flash in your HD9. Under project you are able to choose Android or Windows Mobile.
- Make sure you have selected the right COM port is selected and that baud rate is set to 921600 bps.
- Click on Format to literally format NAND flash of your MT6516 device.

- Then turn off your device, remove the battery and plug the serial cable to the PC and the jack to the phone.
- Click Start, replace the battery and press power button for a few seconds until you see the red progress bar along with the message Format All is Processing.

- After the red progress bar is complete, the real format will begin and a green progress bar will appear.

- When the process is finished a new window will pop up, just press OK to continue.


- Now remove the battery once again, keeping the serial cable connected to the PC and the phone.
- Click Download and make sure that every file needed (again, example for the specific phone used for this tutorial) to flash Android / Windows Mobile is selected:
- Android
- BK Modem DB / RS Modem DB - BPLGUInfoCustomApp_MT6516_S01_MAUI_10A_W10_48
- BK AP DB / RS Modem DB - APDB_MT6516_S00_2010_20
- PRELOADER - preloader_bird16_a10y.bin
- UBOOT - uboot_bird16_a10y.bin
- BOOTIMG - boot.img
- RECOVERY - recovery.img
- SEC_RO - secro.img
- ANDROID - system.img
- LOGO - logo.bin
- USERDATA - userdata.img

- Click Start, replace the battery and press power button for a few seconds until you see the red progress bar along with the message Download is Processing.

- After the red progress bar is complete, there will appear a purple progress bar.
- Right after the purple progress bar is complete, you’ll have to connect the normal USB data cable. The message will appear under the progress bar: “Please insert USB cable in x seconds”.

- After plugging the USB data cable into the phone the download will start. The first time you connect the cable, your computer will detect a new hardware and you’ll have to install MT6516 USB VCOM drivers.

- There will be one yellow progress bar for every part of the ROM (preloader to userdata / xldr to eboot).

- After all is complete a new window will appear with a report of the download. The following popup should appear:


- Now you have completed the process of flashing the ROM into your device. Because the NAND flash was formatted in the beginning of the flash progress, you have now to re-write your phone IMEI1 and IMEI2.
- Open SN Write Tool and make sure that the correct COM port is selected and baud rate is set to 115200 bps.

- While keeping only serial cable connected to the phone, remove the battery and wait 10 seconds with the battery removed.
- Click Start and you be asked to enter IMEI1 and IMEI2. Enter the correct number in the correct fields.

- After entering the correct IMEI numbers and clicking OK, you have to replace the battery and press power button on the phone. If you have flashed Android, => Meta mode will appear in the bottom left of the screen.

Attention: Please follow the instructions carefully. I will not take any responsibility on whatever may happen with your phone.
Update: Here's a trick if you want to flash just one part of the ROM, in this case the recovery. Without formatting flash, deselect all parts except the one you want to flash.

After that, you just have to click start and turn on the phone with USB data cable connected (in this case you don't need the USB serial cable).
